

$13.49. That’s the price for a 16 ounce (one pound) jar of Artisana coconut butter on Amazon. I definitely know that this can get costly. So, what’s the solution?
Make your own of course!
This is a post explaining in detail how you can make this deliciousness at home with just one or two ingredients (including how to overcome the most common problem in making coconut butter at home).
Overcoming the Biggest Problem of Making Coconut Butter At Home
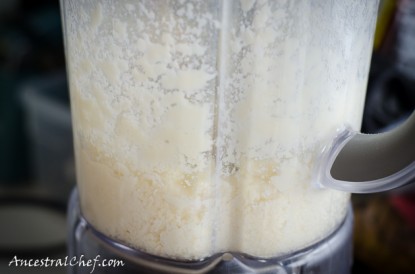
The biggest problem with making coconut butter is that the coconut flakes will stick to the sides of the blender (as you can see in the photo below) instead of getting blended by the blender blades.
However, I’ve found several different ways of solving this problem (depending on what blender or food processor you’re using) and these are detailed below.
1. Blendtec or VitaMix. If you have a Blendtec blender, use the twister jar (it’s sold separately) as this will allow you to twist the top of the jar to scrap the food off the sides of the container while blending. If using a VitaMix blender, use the tamper that comes with the Vitamix to scrape down any coconut flakes that stick to the sides of the container while blending.
For both of these blenders, you just place around 6 cups of coconut flakes into the Blendtec or Vitamix and set it on high – it will take just a few minutes for the coconut butter to be ready. (Feed Your Skull states that it takes only 44 seconds to make coconut butter. Whole New Mom states it takes 2 minutes (with a brief rest in between each minute).)
2. Other Blenders. If you don’t have a VitaMix with a tamper or a Blendtec with the twister jar, like me, then there’s another solution….add some coconut oil (after all, the coconut flakes are basically producing coconut oil).
The process is simple – add in 6 cups of coconut flakes and start blending on high (you need a minimum of around 3 cups of coconut flakes for it to work). When the flakes get stuck to the sides of the blender, turn off the blender and use a spoon to push the flakes down. Repeat 3 times. Then add in 2 tablespoons of melted coconut oil (you can melt it in the microwave) and blend on high for 10 minutes.
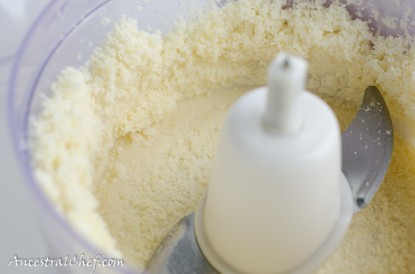
3. Food Processor. As you can see from the photo below, the same problem of the coconut flakes sticking to the bottom and to the sides occurs with the food processor. Adding 2 tablespoons of melted coconut oil to 6 cups of coconut flakes will help again. However, if you have the time and patience, you can keep scraping down and heating up the coconut flakes to make coconut butter without adding any coconut oil (method from TheKitchn).
4. Mini Choppers. I’ve seen a few people suggest that it may be possible to make coconut butter using a mini chopper or one of the chopper attachments to a hand mixer. I haven’t tried this, but it would probably depend on how fast the chopper blade rotated (it might work okay). But note, don’t use an immersion blender as it’ll spray the coconut flakes everywhere!
How do you know when coconut butter is ready?
When you first start blending or food processing the coconut flakes (or coconut shreds), you’ll find that the flakes will lose their dryness and become slightly oily. They’ll start to clump together too.
After a while, enough oil will be produced so that it becomes runny and creamy. The heat of the blender or food processor will make the coconut butter liquidy (even though it will solidify usually below approx. 76F or 25C).
Note that the longer you blend it, the more creamy and less gritty the end coconut butter will be. I personally like my coconut butter to be as creamy as possible, but I know some people like a slightly gritty texture to it.
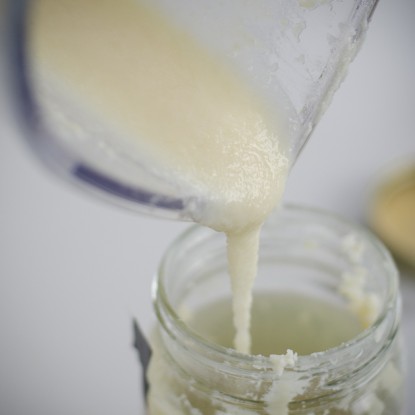
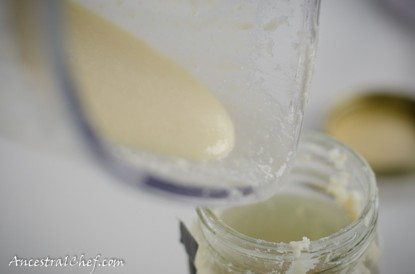
Here’s how it should look when you pour the coconut butter out of your blender:
What type of coconut flakes or shreds to use?
Any type of unsweetened coconut flakes or shreds will work. An alternative is to use coconut powder, which is ground up coconut flakes. (Note that coconut powder is not coconut flour because coconut flour is de-fatted. This means that there is no oil left in coconut flour, so you can’t make coconut butter from it.)
Is it cheaper to make coconut butter rather than buy it?
The cheapest brand of coconut butter on Amazon is the Kevala brand at $9.29, although I typically buy the Artisana brand (which is organic and costs $13.49). Both are 16 oz (one pound) jars.
To make your own one pound jar of coconut butter, you will need one pound of coconut shreds (which is approx 5 cups). For one pound of organic unsweetened coconut shreds (if you buy six pounds from Amazon) is approximately $5.40. (Non-organic is cheaper.)
So the saving is approximately $13.49 – $5.40 = $8.09
This is definitely worth it if you have a VitaMix with a tamper or a Blendtec with a twister jar, but it’s still a pretty hefty savings even if you have to spend 15-20 minutes using a blender or food processor and adding in coconut oil. You might also lose a bit of coconut butter because it’s hard to scrap every last bit out of the blender or food processor, but it’s probably still worth the savings.
Does it taste the same?
I think the only difference is that homemade coconut butter is slightly more gritty than the Artisana one, but it’s not bad. You can also add in other ingredients to flavor the coconut butter while you’re making it (e.g., cocoa powder, spices, or even other nuts). In fact, adding some nuts can even help the process if the nut produces a lot of oil (in which case the additional coconut oil might not be needed).
ancestralchef blogs at Ancestral Chef.
Do you have a recipe post or kitchen-related story to share on the Farm Bell blog?
See Farm Bell Blog Submissions for information and to submit a post.
Want to subscribe to the Farm Bell blog? Go here.


brookdale says:
What do you use the coconut butter for? I have never seen or heard of it. (Guess I lead a sheltered life!)
On February 21, 2013 at 9:13 am
Pam says:
Ok, I was all about this and really interested in making some for my best friend to use…until I came to the part about eating it! I have never heard of coconut butter, I thought it was something you put on your body! I learned something new today.
On February 21, 2013 at 10:55 am
ancestralchef says:
Brookdale and Pam – Coconut butter is really delicious to eat! You can spread it just like any nut butter. And you can even bake with it (as a replacement for any nut butter in a recipe).
One of my favorite ways of eating coconut butter is slathered on top of a piece of dark chocolate. Another way is coconut butter stuffed dates (it’s a really cute and simple dessert).
On February 22, 2013 at 11:42 am
MikeC says:
Tried this today but all i have gotten is ground coconut. Any ideas why?
On February 27, 2013 at 2:35 pm
ancestralchef says:
Mike – You really have to keep the food processor or blender running at top speed for a really long time. You also need to use at least 6 cups of shredded coconut flakes in one go. Adding a bit of coconut oil helps the process along too.
On February 28, 2013 at 3:58 pm
MikeC says:
Tried again last night but no good, Food processor blade was being lifted by the coconut on the bottom of the bowl. Switched over to my blender but ended p with burnt coconut. I need just notice that I used sweetened coconut so maybe that is the problem.
On March 1, 2013 at 4:45 pm
ancestralchef says:
Sorry to hear that Mike 🙁 I have not tried it with sweetened coconut, but it could be that the blender heated up the sugar in the coconut so that it burned?
On March 1, 2013 at 5:03 pm