

I’m not one for making New Years Resolutions. Usually they turn out to be something that I can keep for a few weeks, then give up in frustration. But this year is different! This year I will change! This year, I have made TWO resolutions:
- For 1 month, my husband and I will not succumb to the temptations of restaurants and we will only eat food that was home prepared.
- At least 1 time per month, we will be trying a new recipe or cuisine for us to cook. (I think this will help us get over resolution #1).
My first resolution isn’t really something new; we have given up restaurants before without any issues, and usually, we rarely even think about eating out. But for the month of December, we both made lots of excuses, and ate out a few times too many. I’m still stuffed from all the places we went! The decision to do this again came based upon that month alone.
The second resolution is one that I said I would do when we moved into our apartment this past May. I have a recipe box chock full of clipped articles from magazines and newspapers, and sadly, I haven’t even opened it in months. This is about to change!
Sunday night, since it was the first night of the new year, I made a new recipe. It’s one I’ve wanted to try for a very long time, but was always scared to try. Last night, I made Sushi! It was surprisingly simple and extremely delicious. We had traditional California Rolls and my own concoction of a vegetable roll.
It really was fairly simple to make these, although a bit time consuming. I found a recipe for the California Rolls in my newspaper and was very interested. I found all of the ingredients in my regular grocery store, too, which was a nice surprise.
How to make California or Vegetable Sushi Rolls: Printable
Cook 1 cup white rice in 2 cups of water with 1 teaspoon of rice wine or red wine vinegar. When the rice is cooked (and very sticky), fluff and let cool.
While the rice is cooking, I cut up all of my fillings. I julienned the following:
1/4 peeled cucumber
1/2 peeled carrot
1 small peeled beet
1 small section of an orange bell pepper
1 small avocado
1/2 of a small sweet potato (I microwaved for 3 minutes before cutting so it was cooked and easier to cut)
2 sticks of imitation crab meat
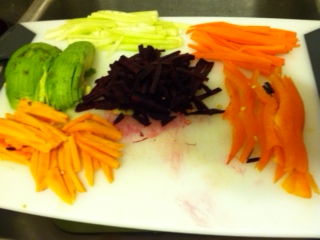
Once that was done, I laid it all out on my cutting board and then taped a piece of waxed paper onto my counter where I’d be rolling the sushi for easier clean up. I covered my sushi mat with plastic wrap (to keep it lasting longer) and my workstation was ready.
When everything was ready, I placed one sheet of nori (seaweed) into the toaster oven at 300 degrees for 3-4 minutes to soften it up. While the nori was toasting, I spread a thin layer of rice about 3/4 the way up the sushi mat with wet hands.
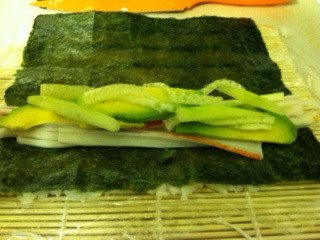
By the time I was done spreading, the nori was ready to come out and I placed it on top. Then I put the ingredients in a line on the bottom third of the nori, and started rolling.

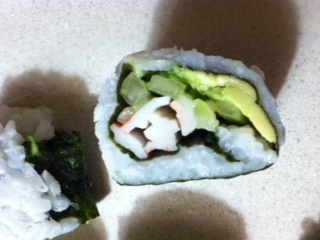
For the California Rolls, I placed crab meat, cucumber, and avocado.
For my vegetable rolls, I used different combinations of sweet potatoes, avocados, beets, carrots and bell peppers. You could probably use any combination of vegetables you have laying around that would compliment each other.
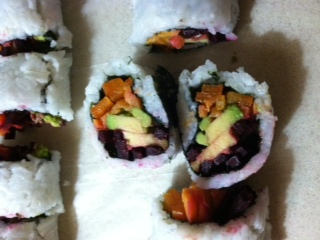
I learned while making this there is some practice needed to make a decent sushi roll. You want to fold the bottom of the roll up over the ingredients, then start rolling the rest. It took a few tries, but in the end, I had 5 rolls ready to be chilled. I put them in the fridge for a few minutes while I cleaned up, cut them and they were ready to be served with soy sauce and wasabi.
I was so happy and proud of myself for doing this. Not only did I learn how to make a great and healthy dinner, I conquered my fear of the unknown and cannot wait to try making some sushi rolls. If I can cook this, I think I can cook almost anything now!
Do you have a recipe post or kitchen-related story to share on the Farm Bell blog?
See Farm Bell Blog Submissions for information, the latest blog contributor giveaway, and to submit a post.
Want to subscribe to the Farm Bell blog? Go here.


BuckeyeGirl says:
Thank you for a great description Katie! I love sushi, but it’s so expensive around here. We have a “snack” supper here usually once a week, and I bet making some sushi earlier in the day would be a great addition!
Not sure I could convince everyone here that it’s a great meal on its own, but still a fun and healthy addition!
On January 5, 2012 at 9:50 am
backwoodsdreaming says:
Your explanation and photos lead me to not only make my own California Rolls & Veggie Rolls for dinner last night, but also actually register an account on this forum 🙂
I found all of the ingredients I needed at my local grocery/homegoods store, except the rolling mat. Instead, I found a silicone baking sheet liner (NOT the expensive silpat liner) for ~$6.00. It worked like a charm and made nice smooth rolls and was super easy to clean up after!
I also found that the rice was stickier than I’d have liked, and think next time I’ll make and cool the rice ahead of time, as my leftovers were far less stickier today.
Thank you, thank you!
On January 6, 2012 at 12:18 pm
whaledancer says:
I like your resolutions, and the sushi rolls look yummy. I took a Japanese cooking class many years ago and we spend several sessions on making sushi. I picked up a few tips that I still remember which might be useful.
The first concerns how to prepare the rice so that it sticks together just enough, without being mushy. Start by using a short grain rice (Japonica) if you can. Then instead of adding vinegar to the water, steam as usual (there are some additional steps of rinsing, polishing, and soaking the rice that you do if you’re going for serious authenticity, but I usually skip them). When the rice is done, you spread it out on a tray or shallow bowl, preferably wood, and drizzle the vinegar over it. Working quickly, you turn the rice lightly with a wooden spatula (as if you were folding beaten egg whites into a cake batter) with one hand, while fanning the rice with the other hand. It’s helpful to recruit a 2nd person to fan, if possible, or use one of those battery operated personal fans, or even a hair dryer set on “cool.”
The second tip concerns the rice vinegar. Instead of plain rice vinegar, try to find seasoned rice vinegar. If you can’t find it, you can make your own. For every half cup of rice vinegar, add 2 Tbsp sugar, 1 tsp salt, and 2 Tbsp mirin (sweet rice wine). Heat enough to dissolve the sugar and allow to cool.
The last tip is that when you are rolling the sushi in the nori, when you get to the last ¼ to ½ inch, moisten the edge of the nori where it overlaps with a little water, so that it sticks to itself better.
On January 7, 2012 at 1:13 am
katieiacobellis says:
I somehow just got all of the emails about your comments and I’m so glad you all liked this! It’s only been about a week, and my husband is requesting sushi for dinner already 🙂
On January 9, 2012 at 8:36 pm