

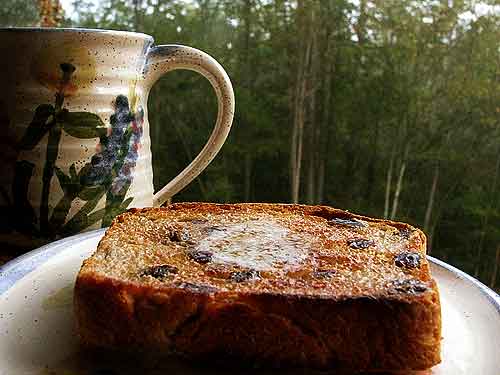
Sweet, juicy, warm, and gooey. Raisin bread! Don’t you just want to toast a big, fat slice of it right now, slather it with butter, and sit down with a steaming cup of coffee to go with? Best of all, it’s a Grandmother Bread recipe.
But first….. I get a lot of questions about breadmaking. In the next few weeks, I’m going to be sneaking some simple secrets to great bread into my regular bread posts. A lot of these secrets aren’t secrets at all–but they’re things that aren’t always on the minds of new breadmakers. After all, when you’re just figuring out how to knead dough and other basics, some seemingly obvious side notes aren’t always so obvious. One of the most common questions I hear is, “How do you get such high loaves?”
Answer: Size matters.
(Get your mind out of the gutter!)
I’m talking about bread pans. I have a lot of bread pans.
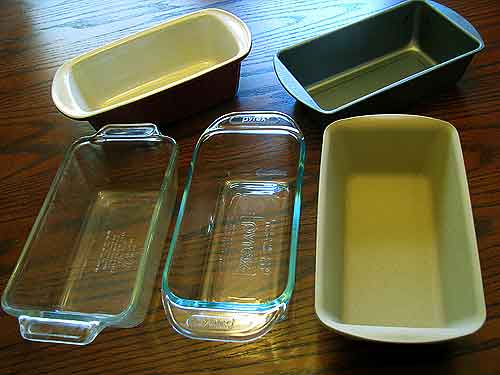
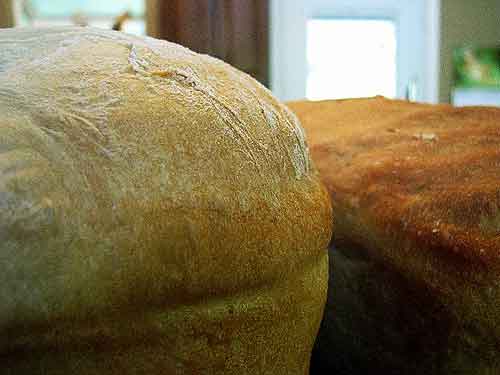
Metal pans, glass pans, stoneware, big ones, little ones, miniature ones, I’ve got it all in a bread pan. Which is my favorite? Glass bread pans. I like the way bread bakes in a glass pan–the crust is just a bit crustier. I also like being able to look at the bread all over when I’m deciding if it’s done.
But not all glass bread pans are created equal.
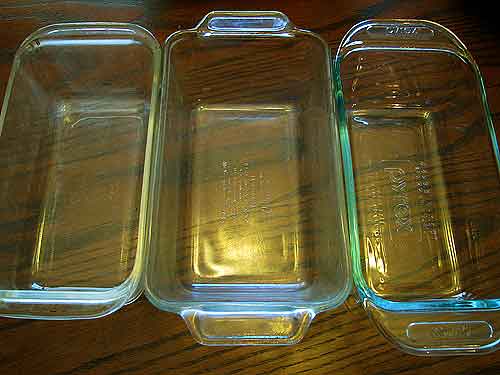
Notice the pan in the middle is wider than the pans on either side. This inequity impacts the final product. See the bread rising higher in the narrower loaf pan here.
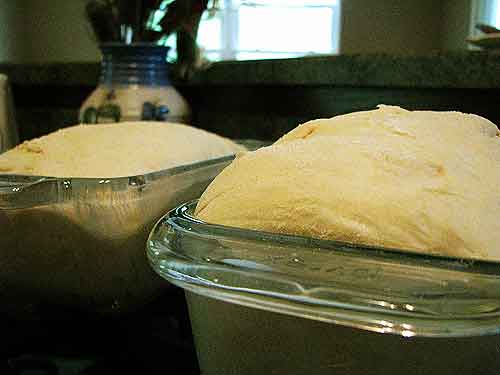
And of course, when it bakes up, the loaf in the narrower pan is higher.
As I said, this is a seemingly obvious secret, but if you only have one or two bread pans, nothing to compare them to, you might not have thought about it.
On a related note, even with a narrower pan, your bread might not turn out high and lovely if the recipe is too small. Some bread recipes aren’t crafted to create high loaves–they simply don’t turn out enough dough. If you’re already using narrow pans and have a bread recipe that isn’t making high loaves for you, consider increasing the recipe (and subsequent baking time) by a quarter or a third to build a bigger loaf.
My Grandmother Bread recipe calls for 1 1/2 cups of water to start the dough (per loaf), which guarantees high loaves.
One more note, use homemade dough enhancer for higher, lighter loaves (particularly when using whole grains). If you’ve never made bread before, see how to make bread.
Oh–are you ready for the raisin bread? This is the one-loaf standard Grandmother Bread recipe with the addition of raisins and extra sugar for more sweetening.

 Printer-Friendly
How to make Raisin Bread:
1 1/2 cups warm water
1 teaspoon yeast
1/2 teaspoon salt
1/4 cup sugar
1 cup raisins
3 1/2 cups flour
In a large bowl, combine water, yeast, raisins, sugar, and salt. Let sit five minutes. Stir in flour with a heavy spoon until dough becomes too stiff to continue stirring easily. Add a little more flour and begin kneading. The amount of flour is approximate–your mileage may vary! Continue adding flour and kneading until the dough is smooth and elastic. Let dough rise in a greased, covered bowl until doubled. (Usually, 30-60 minutes.) Uncover bowl; sprinkle in a little more flour and knead again before shaping dough into a loaf. Place in a greased loaf pan and cover with greased wax paper or a wet paper towel. Let rise until loaf is tall and beautiful! (About an hour, depending on the temperature in your kitchen.)
Bake for 25 minutes in a preheated 350-degree oven.
Note: I replaced one cup of the all-purpose flour with whole wheat in the bread pictured here. You can use straight all-purpose flour, part whole wheat as I did, or make it all whole wheat. (Use homemade dough enhancer if you’re making it with all whole wheat!)
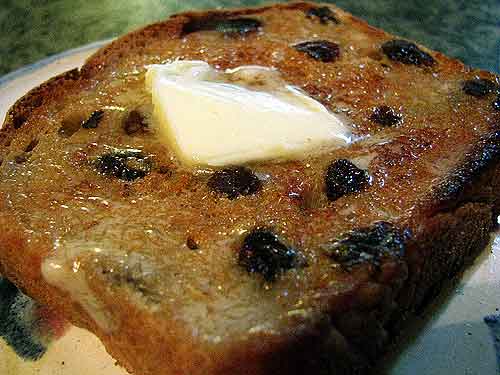
Mmmmmm. Want some?
Variations: Make Any-Fruit Bread! Use one cup of chopped or diced fruit in place of raisins, such as peaches, berries, etc, or any one-cup combination of fruit.
See this recipe at Farm Bell Recipes and save it to your recipe box.
See All My Recipes
Printer-Friendly
Biddy says:
That is just plain cruel! My mouth is watering as I sit here at work :hungry:… and as I am gluten intolerant I can’t have any! *sob* Oooo if you could work out a really good bread for gluten-free people like me I really will let you adopt me
On September 26, 2008 at 3:36 am
TeresaH says:
OMG Suzanne, I am drooling over that last picture here! I love raisin bread, esp. toasted! :hungry:
On September 26, 2008 at 4:05 am
Patty says:
*whines* I want some!! :yes:
On September 26, 2008 at 4:25 am
Kelleh says:
This bread looks super tasty! I’ll have to get brave some rainy day and try to make a loaf myself! 😀
On September 26, 2008 at 6:52 am
Carolyn A. says:
Offer me a nice cup of hot tea with a spoon of sugar only and I’ll sit with you forever and eat toasted raisin bread. Oh my goodness! xxoo
On September 26, 2008 at 7:06 am
Shari C says:
Oh, I’m drooling! I am sitting here with my nice hot cup of coffee and your pictures are making me so envious to have a slice of your raisin bread….so yummy looking. That last picture was just cruel…even my tummy is growling for a slice. Hmmm! Do you like company and do you feed them???
On September 26, 2008 at 8:14 am
Nancy in Atlanta says:
ty666666trf oops, that was Emma, my cat – I’m trying to remember what it was like to actually MAKE a loaf of bread. I did that at ages 15 and 16 with my own grandmother teaching me, and she used glass pans. But that was nearly 60 years ago and now I use my oven to store pots and pans! Oh, Suzanne, I would almost try it again just to smell the bread baking. Taste the freshly baked loaf. Oh, dear, I’m going to make myself cry. :catmeow:
On September 26, 2008 at 8:15 am
annie d. says:
I tried Grandmother Bread last week, but it didn’t rise. It did some the first rise, but nothing the second. (I can’t make the icons work, but if I could, it would be the blue, frowny face, shaking its’ head.)
On September 26, 2008 at 8:15 am
Nancy in Atlanta says:
oh, wait! Too early in the morning! I can’t subtract! NOT 60 yrs ago – 50!!! :shocked:
On September 26, 2008 at 8:17 am
Suzanne McMinn says:
Annie, I’m going to do tips on getting a good rise the next time. It could be several different things–age of your yeast, temperature of the water you used, temperature in your house, among other things. Check your yeast and your water temperature first and try again!
On September 26, 2008 at 8:21 am
MARY says:
:butterfly: You really enjoy torturing people, don’t you??? LOL! I’m starving now! Thanks!
On September 26, 2008 at 8:26 am
IowaDeb says:
I’m not an experienced breadmaker but I soon hope to be! keep it up Suzanne and I’ll start making it, My mouth is watering!
On September 26, 2008 at 8:44 am
Suzanne, the Farmer's Wife says:
Now that the air is crisp I’m going to start baking bread again. I totally agree that the glass bread pans are the best. Thanks for the raisin bread recipe. It looks so delicious with the butter melting on it. Yummy.
– Suzanne, the Farmer’s Wife
On September 26, 2008 at 9:01 am
jane says:
Bread making is an art these days and you have mastered it. At church for communion we have homemade bread and OH MY the smell and taste – makes you want the whole loaf!!!!It looks wonderful too. thanks so much for the tips on pans and rising bread. I dont have any glass pans but will get some.
On September 26, 2008 at 9:16 am
hawkswench says:
Hmmm I was thinking last night of making raisin bread this weekend, wasn’t sure if I was making that or another pie.
One thing I noticed on raising bread dough is how warm it is when your proofing it. During the summer when I do make bread and I let it sit in the sun, it will rise higher then the winter months. You do have to make sure the bowl is warm before adding the yeast and water (when you activate the yeast) or the cold bowl will take away the heat from the water. During the winter months I will heat the oven to about 170 degrees and then shut off the oven with the door slightly cracked at the beginning of activating the yeast. This is so I have a warm (not hot) draft free place to place the bread dough to rise. Another trick is to leave a space between the two racks so you can pour boiling water in a baking pan to make the oven warm and moist during proofing. This method I do when I make breads that require two risings.
On September 26, 2008 at 9:19 am
Crystal B. says:
Yum! I am starving from justing looking at the picture. 🙂
On September 26, 2008 at 9:26 am
midwestmom says:
I’ve never baked bread but I’m going to try! (unless banana or zucchini bread count). I’m going to try your Grandmother Bread soon. Have you tried the NY Times No Knead Bread recipe I keep reading about? I want to try it too but I don’t have one of the pans they use to bake it in.
https://fanaticcook.blogspot.com/2007/01/new-york-times-no-knead-bread.html
On September 26, 2008 at 9:28 am
Grandma Kathy says:
Oh raisin bread – I Love Raisin Bread!
I’m going to have to give your recipe a try.
On September 26, 2008 at 9:30 am
Shasta3 says:
MMMMMMMMMM!!! I am salivating, raisin bread is my FAVORITE!! I would appreciate some advise on the second rise. Everytime I uncover the dough before baking it the dough flattens. I have tried to cover it with a towel or oiled plastic wrap, both with no luck. I am assuming this is happening because the consistancy of my dough isn’t right?!?! I gave up trying a few months ago however, I’m roaring to try some more. Suggestions from anyone with experience would be greatly appreciated!!
On September 26, 2008 at 9:32 am
Claudia W. says:
I have been making Grandmother’s bread for about three weeks now, with great success! You write a very complete and simple recipe that turns out absolutely delicious! I baked bread when my girls were little and I had more time to do those nice little homey things. I wanted to get back into it and found myself cutting out time just for baking bread. I have not had store bought for some time now! Thank you ever so much. My next shopping trip I will buy raisins, cause that is my absolute favorite breakfast, snack, lunch treat, emotional eating, dessert after dinner thing to eat!
On September 26, 2008 at 9:33 am
Patty says:
Omg, these photos are making my stomach grumble, no breakfast yet…! Looks absolutely delicious!
On September 26, 2008 at 9:34 am
Jill S. says:
YUM! Looking forward to trying this one. How about blueberry bread? I have a ton of blueberries on the verge of going bad …
On September 26, 2008 at 9:40 am
Jess says:
Hey, Jill…next time you have an abundance of blueberries try throwing a handful into some brownie batter. Add another few minutes baking time. Yummmmm.
On July 15, 2009 at 11:42 am
Suzanne McMinn says:
Shasta, I do cover the bread pans for the second rise, but I watch it and when the dough gets toward the top of the pans, I’ll take the cover off. Even though I spray oil on the wax paper to cover it (I most often lately am using oil-sprayed wax paper to cover), occasionally it will still stick. I figure sometimes I just don’t spray the wax paper quite completely. If you leave the cover on all the way through the second rise, when you pull the cover off if it sticks, you risk deflating your dough. So I just let it finish the second rise uncovered to avoid that risk!
On September 26, 2008 at 9:41 am
Abiga/karen says:
We were also thinking here about making raisin cinnamon bread this week. First we have to finish the zucchini chocolate chip bread, whole wheat bread, and my daughter’s hubby’s store bought raisin bread.(He does not like homemade stuff but is the Kraft macaroni type person.)My daughter and I like to grind our wheat fresh to make the breads which seems to make a difference in taste to us anyway. Supposed to be healthier too.(Five little ones to feed ten and under) I have trouble with the second rising too in the bread pans. It can depend on not enough flour or too much flour also. If we use our Bosch mixer we don’t let it rise a first time but only in the pans right after kneading. Bread baking I think is one long lifetime experiment trying to get it right. Blessings.
On September 26, 2008 at 10:12 am
Astronomerswife says:
My best tips for high-rising bread are to make sure you don’t add too much flour, and that you DO knead enough. When I first started making bread, I’d keep adding flour until the dough wasn’t sticky at all, about like modeling clay. 😆 I’ve since learned that a slightly sticky dough rises much better! As for the kneading, it is especially important to make sure you knead long enough if you are working with whole wheat – sometimes it takes as much as twice as long to knead a 100% whole-wheat dough as it does an all white-flour dough! The buttermilk-honey-whole wheat bread recipe I usually use for our sandwich bread says to knead for 20 minutes. I thought that was crazy at first, but I was convinced after it turned out the softest, highest-rising whole-wheat loaves I’d ever tried! (I got the recipe from the Laurel’s Kitchen Bread Book.)
On September 26, 2008 at 10:59 am
Amy says:
Key for me are pan size and where I let the bread rise. I keep my house cool, so I always let the bread rise in a warmed oven (about 90-degrees) that is TURNED OFF. The first time 14 made bread, he left the oven on. I love making bread in the summer because I can let it rise outside, in the sun. I always get great loaves in the summer.
Also, to avoid having the bread fall, don’t overproof the second rise, the strands get to thin and the top will fall when you move it or bake it.
On September 26, 2008 at 11:18 am
hayseed says:
O.K. I’m craving raisin bread now, so thanks for the inspiration and also because once I make it, my husband will be my slave for the whole weekend (it’s his favourite).
On September 26, 2008 at 11:56 am
Gizmo says:
That bread looks devine! I can’t wait until I’m able to start baking again. I still can’t get your Grandmother’s Bread recipe to work. I have a recipe for “no knead” bread that we adore….so I’ll keep trying, and feed the family “our” recipe until I figure it out. :bananadance:
On September 26, 2008 at 11:58 am
Kim W says:
WOW! I’m not really raisin lover…but THAT looks AWESOME!!
Blessings from Ohio…
On September 26, 2008 at 12:11 pm
Meadowlark says:
You seem to know what you’re doing, so can you offer some tips about using stand mixers? I’ve heard that they heat up the dough so the rising is different??? And I have a six quart so I almost always have to do 3 loaves at a time.
On September 26, 2008 at 12:53 pm
Suzanne McMinn says:
Hi, Meadowlark! I’m sorry but I don’t know anything about using a stand mixer. I don’t have one and never have. I have a weird thing about stand mixers. I don’t like them. I’m not sure I even have a good reason, LOL. I knead dough by hand.
On September 26, 2008 at 12:57 pm
Margery says:
Raisin bread is my absolute favourite. No fair posting that recipe when I’m not going to be home to try it out! Looks YUMMY!!!
On September 26, 2008 at 1:27 pm
JoAnn says:
To make the loaves rise a bit more, after they have risen a bit above the pan, I preheat the oven to 400 – then put the bread in for 10 minutes at that heat – then reduce to 350 – or whatever the recipe calls for, and bake the rest of the required time. That shot of extra heat will give you maximum rising for the loaves – sometimes I bake 4 at a time and it works well.
Thanks for the bread enhancer recipe – I’m going to make some of that for the wheat bread we love.
On September 26, 2008 at 1:36 pm
catslady says:
I’m just going to sit here and look at your picture and pretend I’m eating it!
On September 26, 2008 at 1:55 pm
Toni Anderson says:
I am so hungry now :hungry:
On September 26, 2008 at 2:40 pm
IowaDeb says:
For Meadowlark on her stand mixer question.
https://forum.kitchenaid.com/forums/forum.asp?FORUM_ID=33
On September 26, 2008 at 2:50 pm
Brandy says:
I can tell you that when I bake bread, I place it on top of the refrigerator to rise. *G*
Looks yummy! I may have to try that!
On September 26, 2008 at 3:24 pm
Estella says:
Yum! I love raisin bread toast/
On September 26, 2008 at 4:16 pm
Donna says:
YUMMMMMM, I bet cinnamon would be good in that raisen bread too! Cinnamon Raisen bread…and you could even put that white icing on top, that hardens – I used to see those loaves in the store.
Good breadmaking tips Suzanne..I need all those tips!!!
On September 26, 2008 at 4:23 pm
torilennox says:
That cow looks VERY sneaky!
On September 26, 2008 at 4:57 pm
Susan C says:
How did you know my mind was in the gutter?
I love raisin bread!
On September 26, 2008 at 4:59 pm
Lorie says:
:sheepjump:
Thanks for the recipe! It looks yummy!
I need more bread pans now!
On September 26, 2008 at 5:23 pm
Egghead says:
Looks so warm and toasty and comforting on a crisp autumn morning. Thanks for tempting me. :chicken:
On September 26, 2008 at 5:39 pm
Kacey says:
Missed this post somehow! Love all the glass bread pans. They are a sexy pan to bake bread in, aren’t they?? I love being able to SEE the bread through them.
On September 29, 2008 at 5:49 pm
LatigoLiz says:
Thanks for the bread pan tips! I have a couple, and recently just bought a non-stick. Maybe I’ll save that pan for banana bread and use the Pyrex for the good stuff; not that banana bread isn’t good because it is.
On October 3, 2008 at 1:46 pm
Debi says:
I have made this raisin bread 3-4 times and it is fabulous..i also made the gransmothers bread. For thanksgiving I made the raisin bread recipe but used cranberries(without the sugar & cinnamon and it was plenty sweet ) and it was oh so good !!!!! However i do have a problem that hopefully someone can help with. I seem to be getting air pockets on the top of my loaves with the raisin bread ….what am i doing wrong ???? :cowsleep:
On December 5, 2008 at 12:25 pm
Suzanne McMinn says:
Hi, Debi! I think it must be a coincidence that it’s just with the raisin bread because it sounds to me as if it’s either a kneading issue (not kneading thoroughly enough can leave pockets of gas that can bake up as air pockets) OR it could be due to over-rising. Possibly, just the different consistency of the dough with having raisins in it led you to not knead as thoroughly? That’s what comes to mind to me, at least.
On December 5, 2008 at 2:26 pm
marylundshu says:
Suzanne,
The recipe calls for 1 teaspoon yeast. Most your other Gma bread recipes say a packet or 1 tablespoon. Just checking before I make it :happyflower:
On April 2, 2009 at 2:08 pm
Suzanne McMinn says:
Hi, Mary! That’s because this is the one-loaf version of the recipe. The two-loaf version calls for a tablespoon (or packet), but for one-loaf, you only need a teaspoon!
On April 2, 2009 at 2:32 pm
Gayle Rogers says:
Is there a certain brand of yeast you like best and where do you purchase it. My grocery stores seem to only carry the Bread Machine yeast in jars or you have to buy the individual packets.
On August 9, 2009 at 8:04 pm
Suzanne says:
No, I don’t have a favorite brand. I buy bulk yeast from Sam’s here, but I don’t care about the store or brand, just the price!
On August 9, 2009 at 10:15 pm
pattie says:
This bread sounds DELISH!! :hungry: I would like to make it “cinnamon”raisin bread. How much cinnamon do you think I would need?
On October 22, 2009 at 4:23 pm
Suzanne says:
Hi, Pattie! See this post and the note at the bottom about cinnamon-swirl raisin bread:
https://chickensintheroad.com/blog/2008/10/03/cinnamon-swirl-bread/
On October 22, 2009 at 4:50 pm
August says:
I just made this bread today…amaaazing hot out of the oven! I’m excited to make toast at work tomorrow (4:30 mornings at Starbucks can only get better with the addition of raisin toast). thanks for the great recipe!
On December 8, 2009 at 6:06 pm
Rituparna ... says:
Hi !
I did try making this bread and used 1 cup of whole wheat flour in the mix but my bread just woulnd’t rise. Not an inch did the bugger budge. The same happened when I tried making the doughnuts even thought they did come out amazing and also for the cinnamon buns. The dough is very heavy and not bread like at all. Please tell me what am I doing wrong ……………..
On January 20, 2010 at 5:02 am
samhatt says:
i love your post..im a sour dough bread freak..i love it..im trying your starter for the sour dough now…and yes the cat fur that i deal with is horrid…i will be trying your raisin bread here in a few days…it is just my son and i..and i make everything homemade from scratch.i have been searching for a great raisin bread recipe…thank you for posting it. :snoopy:
On August 12, 2015 at 8:25 pm